Have you ever accidentally deleted a file on your Mac and then realized that you needed it back? It can be a frustrating experience but don’t worry, there are ways to recover deleted files on Mac without software. In this article, we will explore the top 5 methods to recover deleted files on Mac without software:
- The first method is to check the Trash Bin folder, commonly referred to simply as Trash. The Trash Bin folder should always be the first place to look for deleted files on Mac;
- The second method is to use the Trash Bin via the Terminal;
- The third method is to recover files using a Time Machine;
- The fourth method is to use app-specific recovery features;
- The fifth and final method is to use the Undo command [1];
Each of these methods is unique and can be used to recover deleted files on Mac without software. Let’s dive into each method in more detail and see how you can recover your deleted files on a Mac without software.
Common Reasons For Lost Data on Mac:
1) Accidental Deletion
One of the most common reasons for lost data on Mac is accidental deletion. It can happen to anyone, and you may mistakenly delete a file or folder that contains important data. In some cases, you may empty the trash without realizing that it contains critical files. However, there is good news; if you act quickly, you can recover deleted data on Mac.
To prevent accidental deletion of data, you should be careful when deleting files and folders. Double-check the contents of the trash before emptying it, and keep a backup of your important data in a secure location [2].
2) Malware And Viruses
Mac has a reputation for being secure and less prone to malware and viruses than other operating systems like Windows. However, that does not mean it is invulnerable to these threats. Malware and viruses can cause data loss by infecting and damaging files, stealing sensitive information, or encrypting data and demanding ransom.
To prevent malware and virus attacks, you should install reliable antivirus software and keep it updated regularly. Also, avoid downloading and installing software from untrusted sources, and do not click on suspicious links or pop-ups.
Be wary of phishing emails that pretend to be from legitimate sources and ask you to provide personal information or click on a link.
3) File System Corruption
The file system is part of the operating system that manages and organizes data on storage devices. File system corruption can occur due to various reasons, such as power failure, hardware malfunction, software errors, or improper shutdown. When the file system is corrupted, you may not be able to access your files or even lose them.
To prevent file system corruption, you should always shut down your Mac properly and avoid sudden power outages. Also, do not force quit applications or unplug external devices without ejecting them first. Regularly run the First Aid utility in Disk Utility to check and repair any file system errors.
4) Software Malfunction
Software malfunction can occur due to various reasons, such as bugs, compatibility issues, or conflicts with other applications. When software malfunctions, it can cause data loss by corrupting or deleting files, freezing or crashing the system, or making the system unbootable.
To prevent software malfunction, you should keep your operating system and applications updated with the latest patches and bug fixes. Also, avoid installing incompatible or pirated software, and uninstall any unused or unnecessary applications.
If your Mac experiences software malfunction, you may need to reinstall the affected applications or the operating system itself. However, before doing so, make sure to back up your data to prevent permanent data loss. You can also use data recovery software to retrieve any lost files.
5) Hardware Breakdown
Hardware breakdown is another common reason for lost data on Mac. It can occur due to various reasons, such as physical damage, wear, and tear, or manufacturing defects. When hardware breaks down, it can cause data loss by making the storage device inaccessible or corrupting or deleting files [3].
To prevent hardware breakdown, you should handle your Mac and its components with care, and avoid exposing them to extreme temperatures, humidity, or magnetic fields. Also, regularly check the health of your storage devices and replace any faulty or failing components.
If your Mac experiences hardware breakdown, you may need to replace the affected component or the entire device. However, before doing so, make sure to back up your data to prevent permanent data loss. You can also use data recovery services to retrieve any lost files.
Where Do Deleted Files Go On Mac?
When you delete a file on a Mac, it is moved to the Trash folder. The Trash folder is located in the Dock, and you can open it by clicking its icon. Deleted files remain in the Trash folder until you empty it or manually restore the files by clicking “Put Back”. Once you empty the Trash folder, the deleted files are removed from your Mac’s file system and appear to be gone [4].
However, the files are not permanently erased from the storage device and may still be recoverable using data recovery software until they are overwritten by new data. Therefore, if you accidentally delete a file on a Mac, it’s best to check the Trash folder first before using data recovery software.
How to Recover Deleted Files on Mac Without or With Software:
- Recover Deleted Files from the Trash Bin Folder
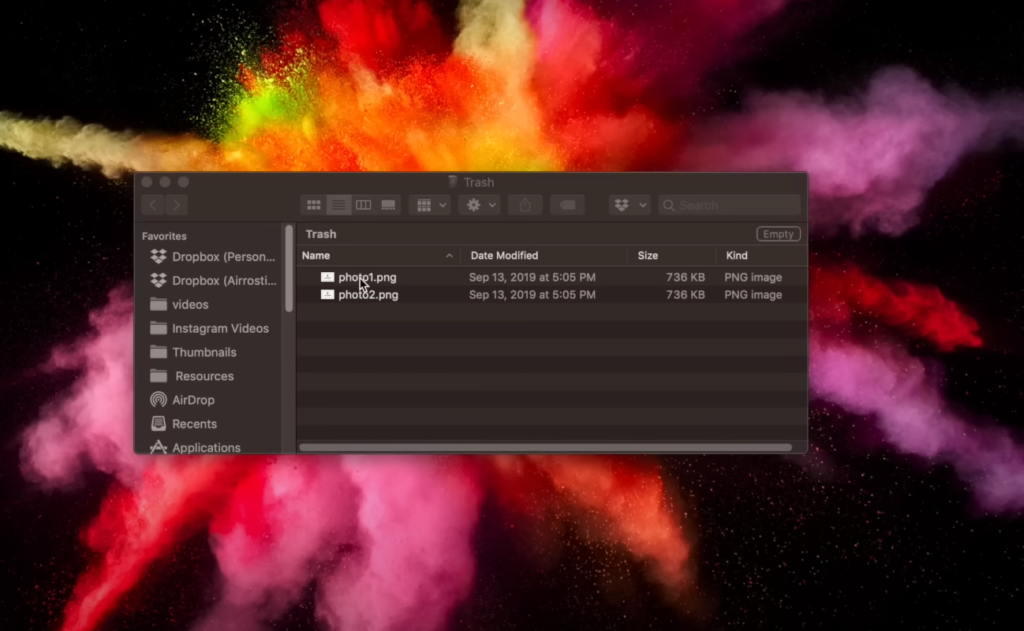
When you delete a file on a Mac, it is not immediately removed from the system. Instead, it is moved to the Trash Bin folder. This means that you can easily recover files from the Trash Bin if you realize that you have deleted them by mistake.
To recover deleted files from the Trash Bin folder, follow these steps:
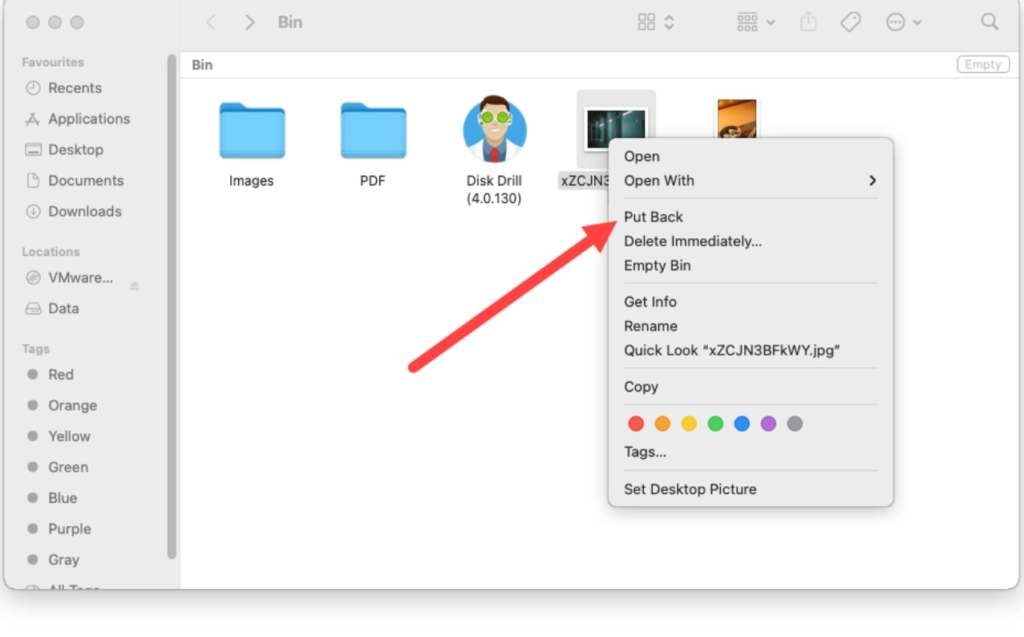
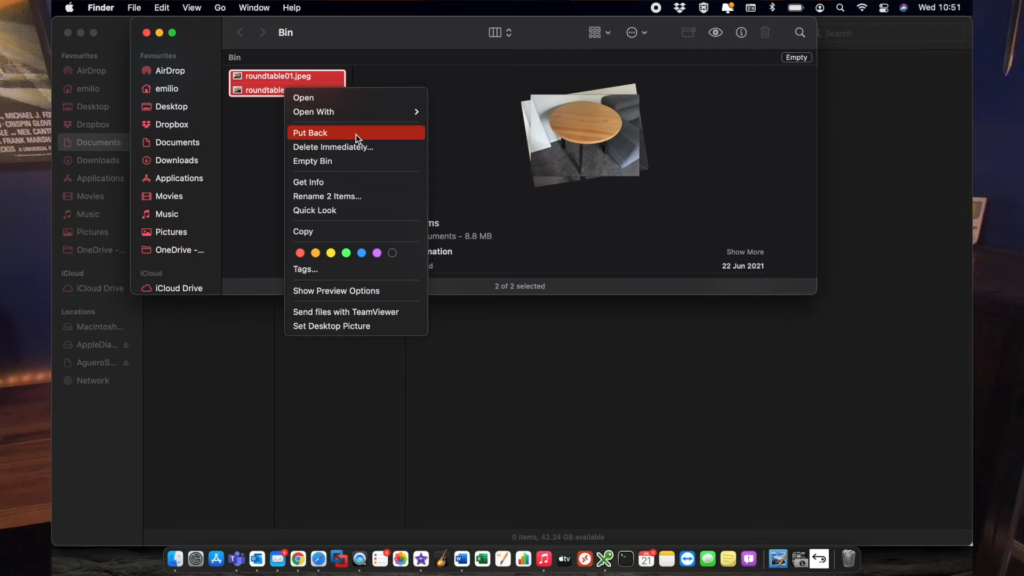
- Open the Trash Bin folder by clicking on its icon on the Dock;
- Locate the file you want to recover and right-click on it;
- Select “Put Back” from the drop-down menu. This will restore the file to its original location;
- Restore Deleted Files via Undo Option
Another way to recover deleted files on Mac without using any software is to use the “Undo” option. This works if you have deleted a file and immediately realize you made a mistake. The “Undo” option is a quick and easy way to recover the file.
To recover a deleted file using the “Undo” option, follow these steps [5]:
- Press “Command + Z” on your keyboard immediately after deleting the file;
- The file will be restored to its original location;
- Retrieve Deleted Files using the Terminal
If you are comfortable with using Terminal, you can recover deleted files on Mac using some simple commands. This method requires a bit of technical knowledge, so if you are not familiar with Terminal, it is best to use one of the other methods described in this article.
To recover deleted files using Terminal, follow these steps:
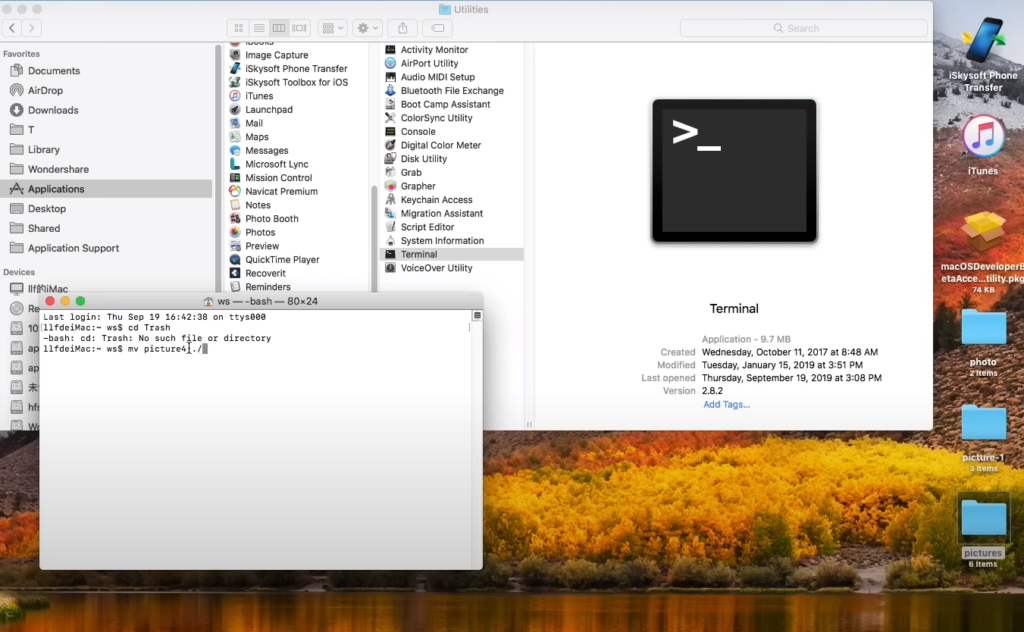
- Open Terminal from the Applications folder;
- Type “cd. Trash” in the Terminal window and press Enter;
- Type “ls” to view the contents of the Trash Bin folder;
- Locate the file you want to recover and type “mv filename ../” (replace “filename” with the name of the file) and press Enter. This will move the file to its original location;
- Deleted Files Recovery from Time Machine
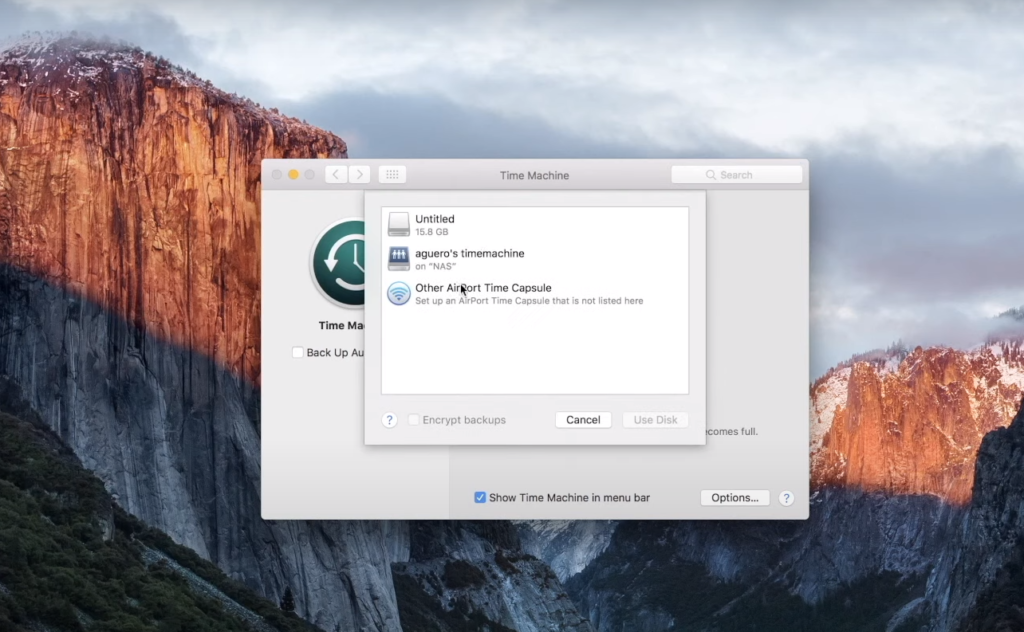
Time Machine is a built-in backup utility in macOS that automatically creates backups of your files and folders on an external hard drive or network drive. It is a reliable and straightforward way to recover deleted files on your Mac.
To recover a deleted file using Time Machine, follow these steps:
- Connect your Time Machine backup drive to your Mac;
- Open the folder where the deleted file was originally located;
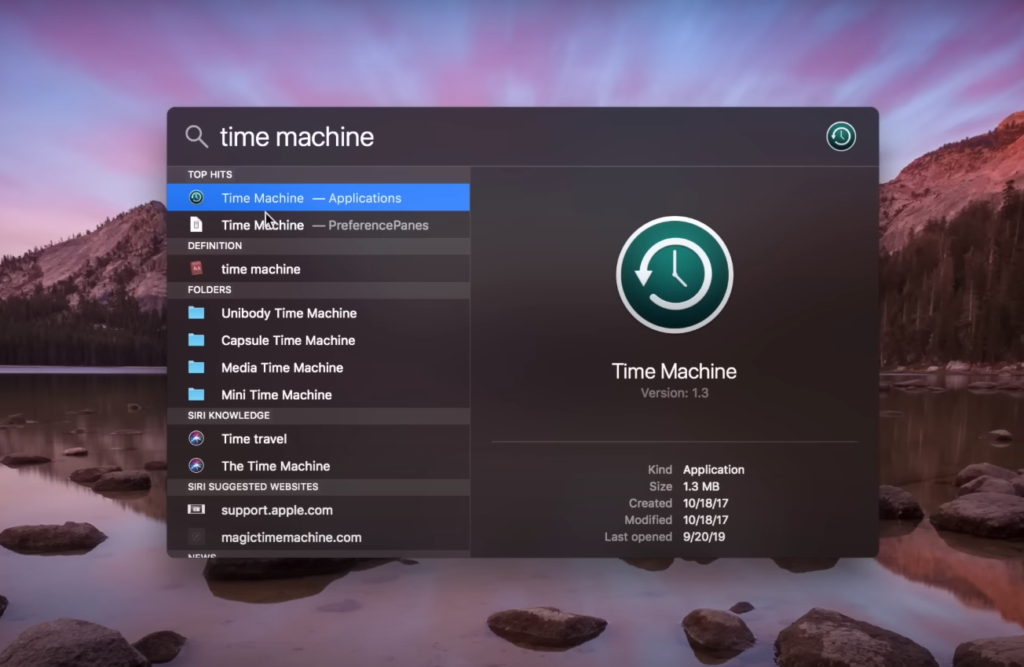
- Click on the Time Machine icon in the menu bar and select “Enter Time Machine”;
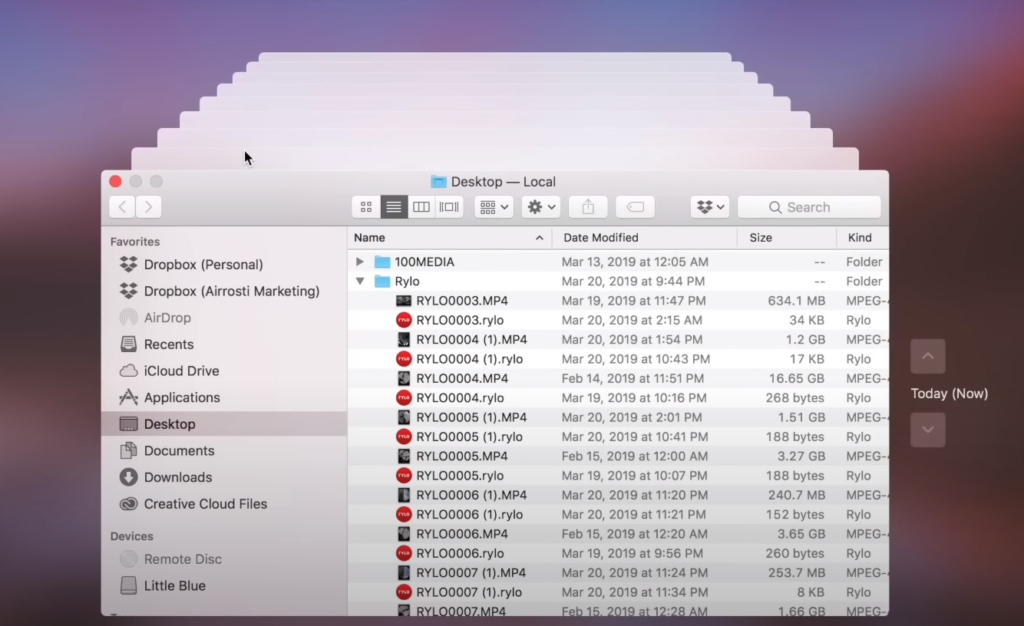
- Use the timeline on the right side of the screen to browse through the backups and find the version of the file you want to restore;
- Once you’ve located the file, select it and click on the “Restore” button [6];
If you have deleted a file and emptied the trash, you can still recover it using Time Machine. Here’s how:
- Connect your Time Machine backup drive to your Mac;
- Open the Time Machine interface by clicking on the Time Machine icon in the menu bar and selecting “Enter Time Machine”;
- Use the timeline on the right side of the screen to go back to the date and time when the file was still on your Mac;
- Locate the file in the backup and select it;
- Click on the “Restore” button to bring the file back to your Mac;
It is worth noting that Time Machine backups are not encrypted by default, so anyone who has access to your backup drive can potentially access your data. To protect your backup, you can encrypt it using the built-in FileVault feature or third-party encryption software.
- Find Deleted Files Back with iCloud Drive
iCloud Drive is a cloud-based storage service that allows you to access your files and folders from any device with an internet connection. It also has a feature called “Recently Deleted”, which keeps deleted files for up to 30 days before permanently removing them.
To recover a deleted file from iCloud Drive, follow these steps:
- Go to iCloud.com and log in with your Apple ID and password;
- Click on the “iCloud Drive” icon;
- Click on the “Recently Deleted” folder on the left side of the screen;
- Locate the deleted file you want to recover and select it;
- Click on the “Restore” button to bring the file back to iCloud Drive;
- If you have deleted a file on your Mac that was synced to iCloud Drive, it will also be deleted from iCloud Drive. However, you can still recover it from the “Recently Deleted” folder on iCloud.com;
- Recover Deleted/Lost Files on Mac with Tenorshare 4DDiG (When Free Recovery Methods Don’t Work)
If the free recovery methods mentioned above don’t work, you may need to use third-party software to recover your lost or deleted files. Tenorshare 4DDiG is one of the best data recovery software for Mac that can recover files lost due to various reasons, such as accidental deletion, formatting, virus attacks, system crashes, and more.
Here’s how to use Tenorshare 4DDiG to recover your data:
- Download and install Tenorshare 4DDiG on your Mac;
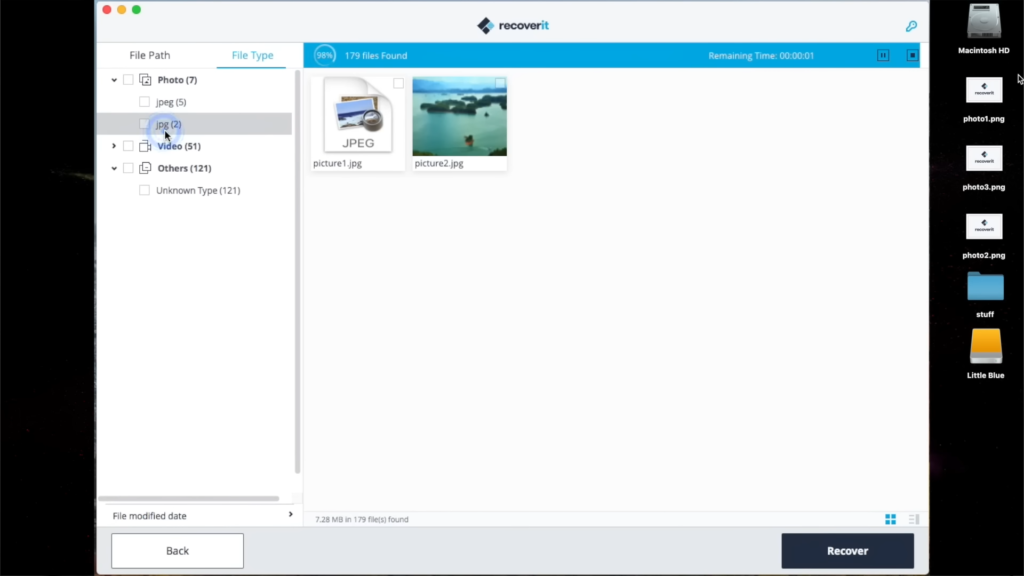
- Launch the software and select the type of file you want to recover, such as photos, videos, documents, or audio files;
- Select the location where the file was originally located or where it was last seen;
- Click on the “Scan” button to start scanning for deleted files;
- Once the scan is complete, select the files you want to recover and click on the “Recover” button;
Tenorshare 4DDiG also has a “Deep Scan” option that can recover files that were not found during the initial scan. However, it may take longer to complete the deep scan, depending on the size of the drive and the number of files it contains.
- Retrieve Permanently Deleted Files on Mac Free Using iBeesoft Data Recovery
iBeesoft Data Recovery is another third-party software that can recover permanently deleted files on Mac. It is easy to use and supports various file types, including photos, videos, documents, emails, and more.
Here’s how to use iBeesoft Data Recovery to retrieve your lost data:
- Download and install iBeesoft Data Recovery on your Mac;
- Launch the software and select the type of file you want to recover;
- Select the location where the file was originally located or where it was last seen;
- Click on the “Scan” button to start scanning for deleted files;
- Once the scan is complete, select the files you want to recover and click on the “Recover” button;
iBeesoft Data Recovery also has a preview feature that allows you to preview the recovered files before restoring them to your Mac.
- Restore Permanently Deleted Files on Mac Free by PhotoRec
PhotoRec is a free and open-source data recovery software that can recover lost or deleted files on Mac, including photos, videos, documents, and archives. It works by searching for the underlying data on the storage device and recovering it regardless of the file system.
Here’s how to use PhotoRec to restore permanently deleted files on Mac:
- Download and install PhotoRec on your Mac;
- Launch the software and select the drive where the deleted file was originally located;
- Choose the file type you want to recover, or select “All” to search for all file types;
- Click on the “Proceed” button to start the recovery process;
- Once the scan is complete, select the files you want to recover and click on the “Recover” button;
PhotoRec can recover files even from damaged or formatted drives. However, it does not have a graphical user interface, and the recovered files may not have their original names or directory structure [7].
- Recover Permanently Deleted Files on Mac with Local Data Recovery Service
If you have tried all the above methods and still cannot recover your lost data, you may need to consider a local data recovery service. These professional services specialize in recovering lost or deleted data from damaged, corrupted, or inaccessible storage devices. They use advanced techniques and equipment to recover data that is beyond the scope of consumer software.
However, local data recovery services can be costly, with prices ranging from a few hundred to thousands of dollars, depending on the severity of the damage and the amount of data to be recovered. It is also essential to choose a reputable and trustworthy service provider to ensure the safety and confidentiality of your data.
How to Restore Deleted Files on Mac (Trash Not Emptied)
If you have accidentally deleted files on your Mac and your Trash has not been emptied, restoring the deleted files is a relatively simple process.
Here are the steps to restore deleted files on Mac [8]:
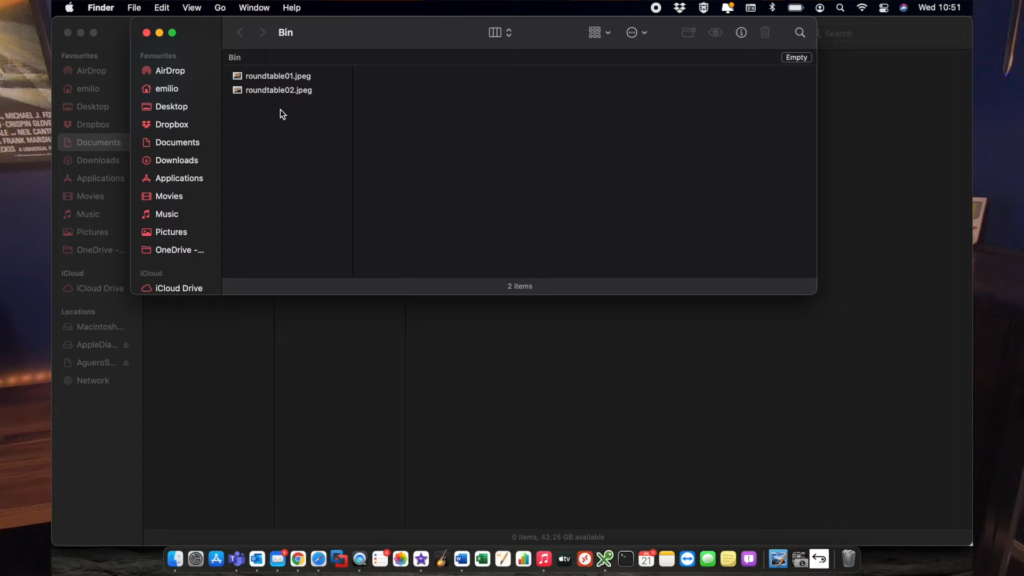
- Locate and open your Trash folder. You can access the Trash folder by clicking on the Trash icon in the Dock or by opening a Finder window and selecting “Trash” from the sidebar;
- Find the deleted files you want to restore. You can sort the files by name, date, or size to make it easier to locate the deleted files;
- Select the files you want to restore. You can click on each file individually or use the Command key to select multiple files;
- Right-click on the selected files and choose “Put Back” from the context menu. This will restore the deleted files to their original location on your Mac;
- If you have accidentally deleted a folder containing multiple files, you can restore the entire folder by selecting it in the Trash folder and clicking on “Put Back”;
Steps to Recover Deleted Files on Mac (From an Emptied Trash):
1) Download and Install Disk Drill for Mac
The first step is to download and install Disk Drill for Mac from its official website. Disk Drill is a popular data recovery software that can help you recover deleted files on a Mac. It is available for free, and the installation process is straightforward. Once the download is complete, double-click on the Disk Drill DMG file to begin the installation process.
2) Launch Disk Drill File Recovery Software On Your Mac
After installing Disk Drill, launch the application from your Applications folder. You will see a welcome screen with the option to start a new scan or continue a previous scan. If you have not used Disk Drill before, click on the “Start” button to begin a new scan.
3) Select the Drive To Be Scanned
Next, select the drive that you want to scan for deleted files. This could be your Mac’s internal hard drive or an external hard drive. Once you have selected the drive, click on the “Search for lost data” button to start the scan [9].
4) Undelete Protected Files on Mac
If you have enabled the “Recovery Vault” feature in Disk Drill, you can use it to recover deleted files that were protected by the feature. Recovery Vault is a Disk Drill feature that keeps track of all deleted files on your Mac, making it easy to recover them when needed. To use this feature, click on the “Undelete Protected Data” button in Disk Drill and select the files that you want to recover.
5) Quick Scan for Deleted Files
Disk Drill also features a “Quick Scan” feature that can help you recover deleted files quickly and easily. This feature will scan your drive for recently deleted files only and list them for you to preview. You can then select the ones you want to recover and click on the “Recover” button at the bottom of the window.
6) Deep Scan for Lost Data
If the Quick Scan does not locate your deleted files, you can also opt for a “Deep Scan”. This mode searches every sector of the selected drive and looks for traces of lost data. It may take several hours to complete this process but it is very thorough in its search. Once the scan is complete, you will be presented with a list of all the deleted files on your Mac. You can then decide which ones you want to recover and click on the “Recover” button at the bottom of the window.
7) Select Your Deleted Files and Recover Them
Once the scan is complete, you will be presented with a list of all the deleted files on your Mac. You can then decide which ones you want to recover and click on the “Recover” button at the bottom of the window. Disk Drill will then begin recovering your selected files back to their original locations.
How to Permanently Delete Files on Mac:
Keyboard Shortcut
One of the easiest ways to permanently delete files on Mac is by using a keyboard shortcut. This method is quick and convenient, and it is ideal when you want to delete individual files or small groups of files.
To use this method, follow these simple steps:
- Select the files that you want to delete;
- Press the “Command” and “Delete” keys simultaneously;
- A pop-up window will appear asking you to confirm the deletion. Click “Delete” to permanently delete the selected files;
It is essential to note that using the keyboard shortcut will permanently delete the selected file(s) without the possibility of recovering them. Therefore, it is crucial to ensure that you have selected the correct files before using this method.
Delete Immediately Feature
Another method of permanently deleting Mac files is using the “Delete Immediately” feature. This feature is a more permanent way of deleting files than using the “Move to Trash” option. When you use the “Delete Immediately” feature, the selected files will be permanently deleted without being moved to the trash can.
Follow these simple steps to use this feature:
- Select the files that you want to delete;
- Hold down the “Option” key and then click on the “File” menu;
- Select the “Delete Immediately” option;
- A pop-up window will appear asking you to confirm the deletion. Click “Delete” to permanently delete the selected files [10];
Using the “Delete Immediately” feature is irreversible, and there is no possibility of recovering the deleted files. Therefore, it is essential to ensure that you have selected the correct files before using this method.
Remove From the Trash
When you delete a file on a Mac, it is moved to the trashcan, where it remains until you empty the trash. However, even after emptying the trash, some files may still be recoverable using specialized software. To permanently delete files on Mac, you can choose to remove them from the trashcan instead of emptying the trash.
Here are the steps to remove files from the trash:
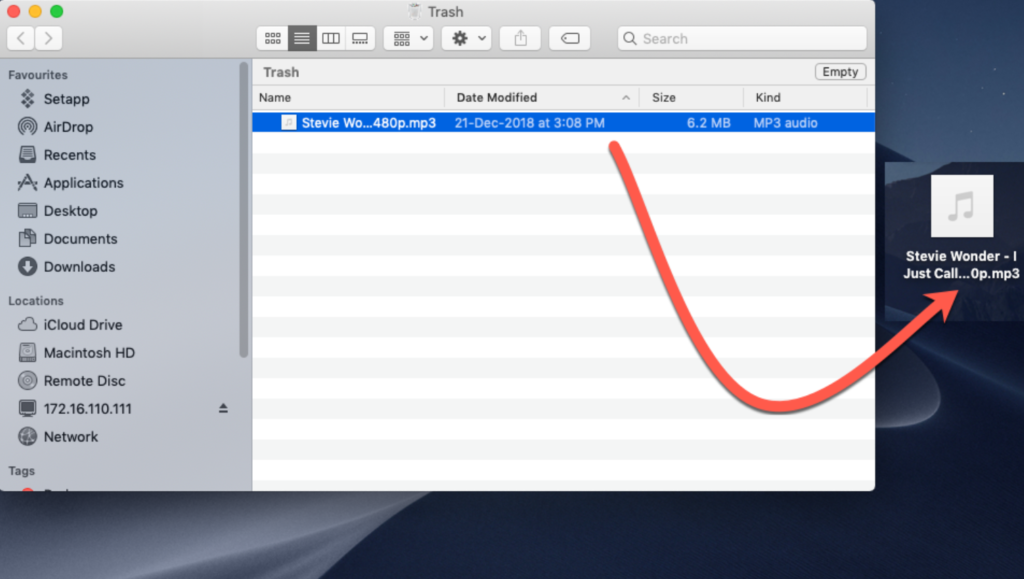
- Open the trash can by clicking on its icon in the dock;
- Select the files that you want to permanently delete;
- Drag the selected files to the desktop or any other location outside the trash can;
- A pop-up window will appear asking you to confirm the deletion. Click “Delete” to permanently delete the selected files;
Removing files from the trash can is a useful way of permanently deleting files on a Mac, especially when you want to delete a large number of files at once. However, it is important to note that files removed from the trash can not be recovered, so it is crucial to ensure that you have selected the correct files before using this method.
Specialized Software
Sometimes, even after using the above methods, deleted files may still be recoverable using specialized software. To permanently delete files on Mac, you can use specialized software designed to erase files beyond recovery.
CClean
CClean is a powerful software tool that helps to remove temporary files, browser cache, and other unwanted files from your Mac. It also has a feature that allows you to permanently delete files, making them unrecoverable.
To use this feature, follow these steps:
- Install CClean on your Mac;
- Launch CClean and select the “Tools” tab;
- Click on the “Drive Wiper” option;
- Select the drive that contains the files you want to permanently delete;
- Choose the level of security you want, such as “Simple Overwrite” or “Gutmann 35 Passes”;
- Click on the “Wipe” button to permanently delete the selected files;
CClean is an excellent tool for permanently deleting files on Mac, and it is also easy to use.
Shredit X
Shredit X is another software tool designed to permanently delete files on Mac. It uses advanced algorithms to overwrite deleted files, making them unrecoverable.
To use Shredit X, follow these steps:
- Install Shredit X on your Mac;
- Launch Shredit X and select the files you want to permanently delete;
- Choose the level of security you want, such as “Simple Overwrite” or “Gutmann 35 Passes”;
- Click on the “Shred” button to permanently delete the selected files;
Shredit X is an excellent tool for permanently deleting files on Mac, and it also has a user-friendly interface.
Disk Drill
Disk Drill is a data recovery software tool that also has a feature that allows you to permanently delete files. It uses advanced algorithms to overwrite deleted files, making them unrecoverable [11].
To use Disk Drill, follow these steps:
- Install Disk Drill on your Mac;
- Launch Disk Drill and select the files you want to permanently delete;
- Click on the “Clean Up” option;
- Choose the level of security you want, such as “Quick Cleanup” or “Secure Cleanup”;
- Click on the “Clean Up” button to permanently delete the selected files;
Disk Drill is an excellent tool for permanently deleting files on Mac, and it also has a feature that helps to recover lost data.
How to Recover Permanently Deleted Files on Mac:
Use Data Recovery Software
Data Recovery software is a great way to recover permanently deleted files on Mac. It works by scanning your entire hard drive, looking for any data that may have been overwritten in the deletion process. Once it has found the data, it will then restore it back to its original state. Data Recovery software usually comes with multiple options like recovery of photos, videos, emails, and more.
Try Time Machine
Time Machine is another great tool to help you recover permanently deleted files on Mac. A built-in backup utility can be easily accessed from the Apple menu bar. To use it, open Time Machine and select “Restore from Backup” to begin the recovery process. You can then choose the folder or file that you want to recover, and it will restore it back to its original state.
Check the Trash Bin
If you’ve just deleted a file, it may still be in the Trash bin. To locate it, click on the Finder icon in your Dock and select “Go to Folder” from the menu bar. Then type in “~/.Trash” and hit enter. From here, you can open any files that may have been recently moved to the Trash bin and restore them back to their original locations.
Use Terminal Commands
Using the “rm” command will delete a file permanently, while using the “mv” command will move a file to a different location. To use these commands, open Terminal, and type in either one of them followed by the path of the file you want to recover. For example, if you want to recover a file located in your Documents folder, then you would type in either “rm /Documents/filename” or “mv /Documents/filename” [12].

How to Protect Files on Your Mac?
If you don’t want to worry about recovering deleted files, the best way is to make sure that your files are safely backed up.
Here are a few tips for protecting your data on your Mac:
- Create Regular Backups. It’s important to create regular backups of your data so that if something happens, you can restore it quickly and easily. You can use Apple’s Time Machine or an external hard drive to back up on a regular basis;
- Use Cloud Storage. Storing your files in the cloud is another great way to protect them from accidental deletion and other risks. Services like iCloud and Dropbox offer secure storage solutions that allow you to access and share your files from any device with an internet connection;
- Use Encryption. If you are storing sensitive information on your Mac, it’s important to make sure that your files are encrypted so that they can’t be viewed or stolen by unauthorized users. Apple has built-in encryption tools like FileVault and third-party applications such as PGP or VeraCrypt can also be used to encrypt your data;
- Install Security Software. Installing a reliable security solution is an essential part of protecting your Mac from viruses, malware, and other threats. Regularly running scans with anti-virus software will help to ensure that all of your files remain safe and secure;
FAQ:
- Are there any app-specific recovery features on a Mac?
Some applications on a Mac have their own built-in recovery features.
For example, Microsoft Office allows users to recover unsaved documents in the event of a crash or accidental closure [13].
Similarly, Apple’s iWork suite of apps, such as Pages, Numbers, and Keynote, has an auto-save feature that automatically saves changes as they are made, minimizing the risk of data loss.
Additionally, some third-party apps, such as data recovery tools, have specific features that allow users to recover data from specific applications or file types.
- How to undelete files on a Mac without the software?
If you delete a file on a Mac, it is typically sent to the Trash folder. To undelete a file without using software, simply open the Trash folder, locate the file you want to restore, and drag it back to its original location. Alternatively, you can select the file and choose the “Put Back” option from the context menu. If the Trash has been emptied, there is no way to undelete files without using third-party data recovery software.
- How do I recover deleted files on my Mac for free?
There are several free data recovery software options available for Mac users, such as Disk Drill, PhotoRec, and TestDisk. These programs are designed to scan your hard drive for deleted files and attempt to recover them. However, keep in mind that free software may not be as effective as paid options, and some recovery attempts may not be successful.
- Are files permanently deleted from Mac?
When you delete a file on a Mac, it is not permanently deleted immediately. Instead, it is sent to the Trash folder, where it remains until the Trash is emptied. Once the Trash is emptied, the file is still recoverable using data recovery software until it is overwritten by new data.
5. How do I recover permanently deleted files?
When you permanently delete a file on your computer, it may still be recoverable through certain means. First, check your recycle bin or trash to see if the file is still there. If not, you can try using file recovery software such as EaseUS Data Recovery Wizard or Disk Drill.
These programs scan your computer for deleted files and attempt to recover them. It’s important to note that the longer you wait to try to recover a deleted file, the less likely it is that you’ll be able to recover it.
- Where do deleted files go on Mac?
When you delete a file on a Mac, it is moved to the trash bin. You can access the trash bin by clicking on the trash icon on your dock or by opening a Finder window and clicking on the “Trash” shortcut in the sidebar.
- Are deleted files gone forever?
When you delete a file, it is not necessarily gone forever. In many cases, the file is still on your computer’s hard drive, but the space it occupies is marked as available for new data to be written to. Until new data is written over the old data, it is possible to recover deleted files.
- Does Mac keep file history?
Mac does not keep a history of files by default. However, you can use the Time Machine feature to create backups of your files, which allows you to go back in time and recover previous versions of your files.
- Does Mac have a recently deleted folder?
Yes, Mac has a recently deleted folder called “Trash”. When you delete a file, it is moved to the Trash folder. You can access the Trash folder by clicking on the Trash icon on your dock or by opening a Finder window and clicking on the “Trash” shortcut in the sidebar.
- Can I recover deleted Mac files from 2 years ago?
It may be possible to recover deleted Mac files from 2 years ago if they have not been overwritten by new data. The chances of recovery depend on various factors such as the type of storage device, the amount of data written to it since the deletion, and the recovery tool used.
To recover deleted Mac files from 2 years ago, you can use data recovery software like Disk Drill, EaseUS Data Recovery Wizard, or Stellar Data Recovery for Mac [14]. These tools scan the storage device and attempt to recover deleted files.
Useful Video: How to Recover Deleted Files on Mac Without Software [2023 Edition]
References:
- https://4ddig.tenorshare.com/mac-recovery-solutions/how-to-recover-deleted-files-on-mac-without-software.html
- https://www.handyrecovery.com/recover-deleted-files-on-mac-without-software/
- https://www.macgasm.net/data-recovery/recover-files-without-software/
- https://www.anyrecover.com/deleted-files-recovery-data/recover-deleted-files-on-mac/
- https://iboysoft.com/mac-data-recovery/recover-deleted-files-mac.html
- https://www.cleverfiles.com/recover-deleted-files-mac.html
- https://www.easeus.com/mac-file-recovery/recover-mac-deleted-file-from-trash.html
- https://www.aiseesoft.com/how-to/recover-deleted-files-from-mac.html
- https://recoverit.wondershare.com/free-data-recovery/recover-deleted-files-without-software.html
- https://www.cisdem.com/resource/how-to-recover-deleted-files-mac.html
- https://toolbox.iskysoft.com/mac-data-recovery/recover-deleted-files-mac-without-software.html
- https://www.bitwar.net/1331.html
- https://www.ibeesoft.com/recover-data/recover-deleted-files-on-mac.html
- https://7datarecovery.com/blog/recover-permanently-deleted-files-mac/